Hello! This simple tutorial will teach you how to make a basic AI that can automatically find and follow paths.
Before we begin, you should have knowledge from the Advanced Scripting Tutorial.
Creating a Course & Rig
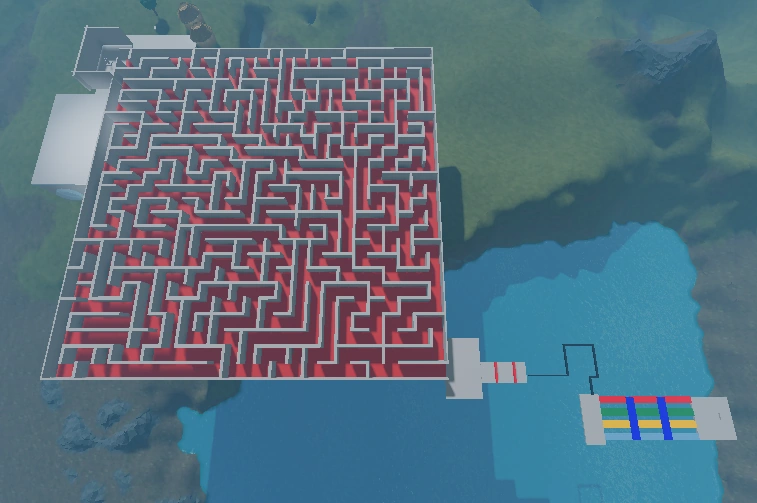
This is the obstacle course I will be using for this tutorial. It contains a maze, lava jumps, a tightrope, and a Pick-a-Path puzzle. These are all free models, so if you would like to use these, they are all available in the Toolbox.
Now, we need to create a starting point at the start of the maze. To prevent any confusion, it is best to box the location in.
Finally, at the end of the course, you should have one end pad. Or, you could get the coordinates of the end location.
Now, we need to make the robot itself. Remember, in order for this to work, the robot needs to have a Humanoid object inside. Ideally, you should insert a rig via the Rig Builder.
Creating a Path
Now we need to create a path. Insert a script into the rig and use a service called PathfindingService.
local pathService = game:GetService("PathfindingService")
Now we set up a few local variables for the starting and endpoint, as well as the humanoid.
local start = script.Parent.HumanoidRootPart
local End = game.Workspace.EndPoint
local hum = script.Parent.Humanoid
Here, the Starting point is the robot's HumanoidRootPart. The end point is the part in the Workspace called "EndPoint."
Now we use a function called Create Path to create a blank path.
local path = pathService:CreatePath()
Of course, we have yet to give the system a starting and end point. We use the function ComputeAsync() so the system will compute the shortest possible path.
path:ComputeAsync(start.Position, end.Position)
--Alternatively,
path:ComputeAsync(Vector3.new(x1,y1,z1), Vector3.new(x2,y2,z2))
If you use coordinates, replace x1, x2, and so on with the corresponding numbers. Still, we have yet to make the robot actually make the path.
Waypoints
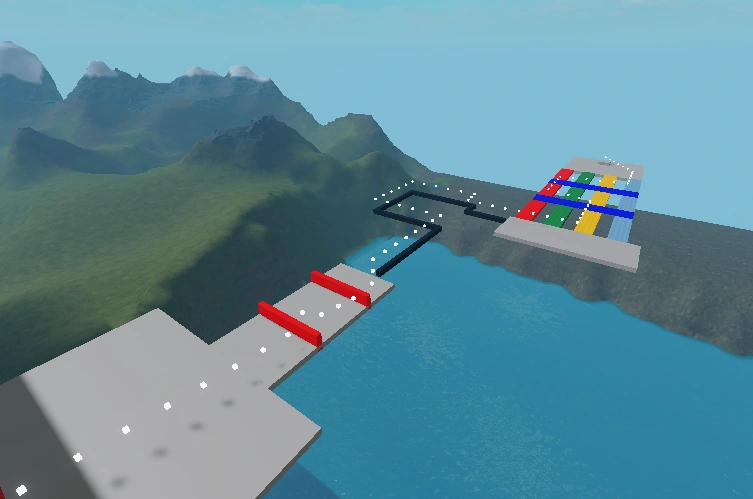
Waypoints are little points along the path that the robot follows to the final destination. I modified my final script to produce these dots. Each of these dots is 1 waypoint.
Now, we need to use the GetWaypoints function to get the waypoints. What the function does is that it returns an array, consisting of the coordinates of each waypoint in order.
local waypoints = path:GetWaypoints()
Finally, we need to use the MoveTo function to move to each waypoint. Of course, because the waypoints are in an array, we use an in pairs loop.
for i, waypoint in ipairs(waypoints) do
	Humanoid:MoveTo(waypoint.Position)
end
But, if you remember, if you use any sort of loop at all, you need at least one delay. So, we use the MoveToFinished event to wait until the MoveTo is finished, before repeating the loop.
for i, waypoint in ipairs(waypoints) do
	Humanoid:MoveTo(waypoint.Position)
	Humanoid.MoveToFinished:Wait()
end
However, the robot cannot jump over the lava jumps. To fix this, there is a property of each waypoint called "Action," which tells it what action it must perform. So, set up an if statement so that if the waypoint requires it to jump, it does jump.
if waypoint.Action == Enum.PathWaypointAction.Jump then
		Humanoid.Jump = true
end
And that's all! Once the lava jumps are through, it will easily do the tightrope and Pick-a-Path with a breeze! In case you were having trouble following along, here is the final script:
local PathfindingService = game:GetService("PathfindingService")
local Humanoid = script.Parent:WaitForChild("Humanoid")
local Root = script.Parent:WaitForChild("HumanoidRootPart")
local goal = game.Workspace.Goal.Position
local path = PathfindingService:CreatePath()
path:ComputeAsync(Root.Position, goal)
local waypoints = path:GetWaypoints()
for i, waypoint in ipairs(waypoints) do
	Humanoid:MoveTo(waypoint.Position)
	if waypoint.Action == Enum.PathWaypointAction.Jump then
		Humanoid.Jump = true
	end
	Humanoid.MoveToFinished:Wait()
end
| Scripting (44) |
| ||||||||||
|---|---|---|---|---|---|---|---|---|---|---|---|
| GUI (8) |
| ||||||||||
| Building (3) |
| ||||||||||
| Platform (8) |
| ||||||||||